Monday, October 8, 2012

Converting Adobe Photoshop ACV to LUT for color grading

So, what does this even mean and what’s its purpose? First, ACV is the Adobe Photoshop curves file format, which stores color mapping information. An artist can easily create an .acv preset, which can drastically change the mood and color tone of the image. Second, LUT is just a look-up table, in our case a small 3D space which maps a RGB color to another RGB color. LUTs can be effectively used for nice and cheap post processing.

An identity LUT

Basically, ACV and LUT are both the same thing, represented differently. Only the latter is usable in real-time rendering applications at negligible costs, though. Now that we understand the problem we’re solving, let’s take a look at

The theory

An .acv preset (generally) contains curves for each color component - red, green and blue. A curve is just a function f : X -> X, where the domain(and co-domain) is the integers in the interval [0, 255]. The curve is defined by a number of control points which change its shape. Here’s a little more graphical explanation (you can find the curve editor in Image -> Adjustments -> Curves):

Photoshop curve editor

This image shows the mapping of the blue channel. For example, every color that has a blue component of 210 will be transformed to a color with blue component of 116. You can adjust the curves for the red and green channels, too, giving you full control. There is also a master RGB curve which is applied after the individual channel curves. For example, if the master curve maps a value of 116 to 80, the cumulative result of the blue curve and the master curve will be a mapping of 210 to 80 for the blue channel.

Before we do anything further, we should first understand the information stored in the preset. Adobe has been kind enough to publish the specifications of the .acv file format.

Length
Description
2
Version ( = 1 or = 4)
2
Count of curves in the file.
The following is the data for each curve specified by count above
2
Count of points in the curve (short integer from 2...19)
point count * 4
Curve points. Each curve point is a pair of short integers where the first number is the output value (vertical coordinate on the Curves dialog graph) and the second is the input value. All coordinates have range 0 to 255.

Pretty straight-forward.

The question now is “how do we convert that curve to a lookup table”. The curve is defined completely by a finite set of points, so we can paraphrase the question as “how do we obtain a polynomial that passes through a number of predefined points”. And that’s where numerical analysis comes in handy. There are various methods for doing that, such as cubic spline interpolation or interpolation using Lagrange polynomials. They both work fine and I chose to use spline interpolation since it came to mind first. I’ll spare you the details, but you can find an explanation on cubic spline interpolation in any numerical analysis book or in the Wikipedia article.

The implementation

Now that we have our polynomial we have to make the LUT we’re talking about. But how big should it be? 256^3? That’s 64MB for 32-bit color, totally unacceptable! As stated by Kaplanyan in his CryEngine 3 talk at Siggraph 2010, 16^3 seems to be enough and from my experiments I tend to agree with that claim. That brings the memory footprint down to just 16KB for a single LUT!

The code for generating the small LUT cube is nothing special, we just take discrete samples of the curve:

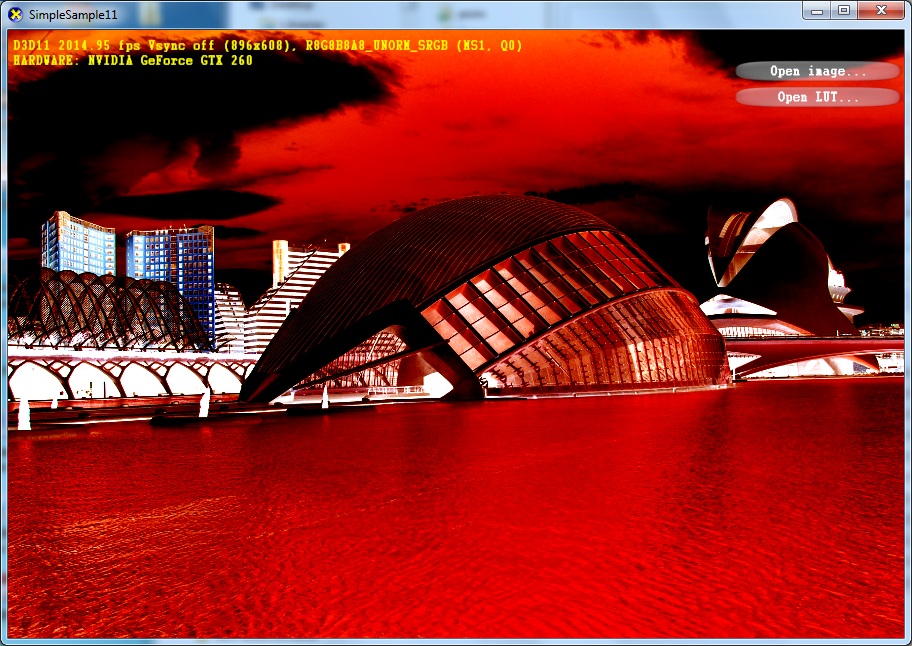
We’re pretty much done here, so I’ll demonstrate how this "hard" work pays off with a simple sample based on, well, SimpleSample11 from the DirectX SDK (it runs only on Windows Vista SP2+). The program uses a simple well-known trick for drawing a full-screen triangle with no actual vertex data for displaying a selected image and the shader modifies the color based on the LUT. When creating the LUT itself, the loading options are set so no mips are created as they are not needed (although even if you do create mips, the shader uses SampleGrad to sample the top surface). There isn't much more to the implementation than that. Except that by default DXUT creates a backbuffer with sRGB format, which makes us do the gamma correction in the shader (or create the resource view with the appropriate format). You can find the code in the github repository at the end of the post.

One important note that’s worth mentioning: you should use a sRGB color profile in Photoshop to match the colors of the generated LUT. You can check the profile used in Edit -> Color Settings.

Finally, here are some sample images I made:


Original

Color negative

Cross process

Dark

Vintage

Download ACV/LUT convertor, sample application and presets from github

Monday, October 1, 2012

Documenting JavaScript with Doxygen

As you already know (Coherent UI announcement) we are developing a large C++ and JavaScript project. We have documentation for both programming languages. The main requirements for the documentation are:
  • Application Programming Interface (API) references and general documentation such as quick start and detailed guides
  • cross references between the API references and the guides
  • accessible online and off line
  • easy markup language
There are a lot documentation tools for each language - DoxygenSandcastle for C++, YUIDocJSDuck for JavaScript. Our project API is primary in C++, so we choose Doxygen. It is great for C++projects, but it doesn't support JavaScript. There are some scripts that solve this by converting JavaScript to C++ or Java. Unfortunately they do not support the modules pattern or have inconvenient syntax for the documentation. Our JavaScript API consists mostly of modules, so we wrote a simple doxygen filter for our documentation. A doxygen filter is a program that is invoked with the name of a file, and its output is used by doxygen to create the documentation for that file. To enable filters for specific file extension add in the doxygen configuration file. Lets say we want to document the following module:
The filtered output looks like:
A nice surprise is that when you want to link to Sync.load you can use `Sync.load`. The only annoying C++ artifacts in the JavaScript documentation are the "Sync namespace" and using "::" as resolution operator, but they can be fixed by a simple find / replace script. The doxygen.js filter is available at https://gist.github.com/3767879.

Monday, September 24, 2012

Announcing Coherent UI

Finally! We, the Coherent Labs team, are very proud to announce our first product - Coherent UI.


After a mammoth work (that is of course still on-going), I can openly talk about the exciting new technology we are building.

Coherent UI is a user interface middleware aimed at game development companies. It greatly increases the quality and optimizes production costs for UI development.
HUD, in-game browser and a game-in-the-game; all integrated through Coherent UI

The biggest news - you can write the UI for ANY type of game on ANY platform with HTML5. I am a big fan of using the right tools for the job they are designed for and I think HTML5 is exactly the kind of tech game companies have been lacking in their development ecosystem.

Now that I can talk about it, I'll be able to write much more about the technology we are creating and how we achieved many of our goals. For a quick-start I'll list some of the tech features we had in mind when we started and that are now available:

  • Feature-full HTML5 and CSS3 rendering (3D elements in your UI + canvas + WebGL!)
  • GPU acceleration
  • Multi-platform
  • Full browsing support (you can have a fully featured browser embedded in your game)
    •   SSL
    •   plugins
    •   cookies
    •   local storage
    •   proxies
    •   etc.
  • Fast JavaScipt (yes, it's usually V8)
  • Super fast and powerful binding (native <-> JavaScript = FAST)
  • Debugging and profiling (you can debug JS code with breakpoints, watches etc.; performance profiling on JS and rendering)
  • Built-in support for click-through queries (I've seen unbelievable hacks in the past dealing with this and couldn't stand it anymore) 
  • Proper composition of ClearType text on transparent background (it's amazing how few people get this one right)
  • Easy to use and clean API (it's more difficult than it sounds)
A sample game menu made with Coherent UI

These is just a high-level overview of what we now have and continue to improve.


Stay tuned for I plan to post many of my thoughts about how we achieved all this, what mistakes we made (and probably are still making) and what went really right. Hope you'll enjoy.

You can check out Coherent UI on our site for free. 

Monday, September 10, 2012

Debugging undebuggable applications with PIX

Developers can ask DirectX 9 not to allow PIX to debug their application by calling D3DPERF_SetOptions(1). I knew that and encountered several commercial applications using it. One day, I was fooling around with Portal 2 and wanted to feed my curiosity on how some stuff is done but when I started PIX all I got was “Direct3D Analysis Disabled” and I knew it was the time to find a way to circumvent this little peculiarity. So, let’s see how can we convince DirectX to ignore the request of the said developers.

I started with a simple application:


Let’s check out the disassembly of the D3DPERF_SetOptions(1) call:

_D3DPERF_SetOptions@4:
72EC7402 8B FF             mov     edi,edi  
72EC7404 55               push     ebp  
72EC7405 8B EC             mov     ebp,esp  
72EC7407 83 EC 18         sub     esp,18h  
72EC740A A1 50 92 FC 72   mov     eax,dword ptr [___security_cookie (72FC9250h)]  
72EC740F 33 C5             xor     eax,ebp  
72EC7411 89 45 FC         mov     dword ptr [ebp-4],eax  
72EC7414 A1 54 74 EC 72   mov     eax,dword ptr [string "DirectX Direct3D SO" (72EC7454h)]  
72EC7419 89 45 E8         mov     dword ptr [ebp-18h],eax  
72EC741C 8B 0D 58 74 EC 72 mov     ecx,dword ptr ds:[72EC7458h]  
72EC7422 89 4D EC         mov     dword ptr [ebp-14h],ecx  
72EC7425 8B 15 5C 74 EC 72 mov     edx,dword ptr ds:[72EC745Ch]  
72EC742B 89 55 F0         mov     dword ptr [ebp-10h],edx  
72EC742E A1 60 74 EC 72   mov     eax,dword ptr ds:[72EC7460h]  
72EC7433 89 45 F4         mov     dword ptr [ebp-0Ch],eax  
72EC7436 8B 0D 64 74 EC 72 mov     ecx,dword ptr ds:[72EC7464h]  
72EC743C 89 4D F8         mov     dword ptr [ebp-8],ecx  
72EC743F C6 45 ED 44       mov     byte ptr [ebp-13h],44h  
72EC7443 8B 4D FC         mov     ecx,dword ptr [ebp-4]  
72EC7446 33 CD             xor     ecx,ebp  
72EC7448 E8 D3 A1 F5 FF   call     @__security_check_cookie@4 (72E21620h)  
72EC744D 8B E5             mov     esp,ebp  
72EC744F 5D               pop     ebp  
72EC7450 C2 04 00         ret     4

Some movs, xors, runtime security check and that’s it, nothing with the actual value we passed to D3DPERF_SetOptions... well that was big nothing.

Ok, take two - let’s first start the application with PIX and then attach.
We’ll have to add some code to give us time to attach:


Use something like this, or just a Sleep() for enough time. Now what do we have with the new setup:

_D3DPERF_SetOptions@4:
72EC7402 E9 46 77 AA E8   jmp     HookedD3DPERF_SetOptions (5B96EB4Dh) 

All right, the sneaky PIX has modified d3d9.dll's memory and now it has a jmp in the beginning! The function it now executes takes us inside PIXHelper.dll:

HookedD3DPERF_SetOptions:
5BF6EB4D 8B FF             mov     edi,edi  
5BF6EB4F 55               push     ebp  
5BF6EB50 8B EC             mov     ebp,esp  
5BF6EB52 83 7D 08 01       cmp     dword ptr [ebp+8],1  
5BF6EB56 75 0B             jne     HookedD3DPERF_SetOptions+16h (5BF6EB63h)

We’ve only had one push so far (for the value we passed) and we push ebp, so that’s 2 pushes. After "mov ebp,esp" ebp is the same as the stack pointer, so dword ptr [ebp + 8] would be exactly the value we passed to D3DPERF_SetOptions. We compare that to 1 and if it’s equal some procedures are invoked that stop the execution. If it isn’t - we follow the jump specified by jne. What we have to do is make that jump unconditional - i.e. always execute the jump, regardless of the value passed. We don’t care about the code that pops the message for disabled analysis so we have plenty of bytes to play with; However, we don’t need them as we can see in “Intel® 64 and IA-32 Architectures Software Developer Manuals” - what we’re looking for is the EB cb variant of jmp, the exact same amount of bytes as the used jne instruction. Now all that’s left is open PIXHelper.dll with a hex editor (I used Notepad++ with hex-editor plugin), search for some of the bytes (try “8B EC 83 7D 08 01 75 0B” - I found it only once) and change the 75 to EB. Voila! Now you won’t see that annoying warning anymore.

Friday, September 7, 2012

Building boost 1.51 with MSVC for Windows with debug symbols

This post is just a quick “note to self” for future reference. We wanted to update our boost source to the latest version, so I started building it with the usual “bjam --build-type=complete debug-symbols=on debug-store=database”. For some reason, however, there were a lot of .pdbs in the boost root folder and many libraries could’t be built as DLLs. For example, building boost::thread failed with “...failed compile-c-c++ bin.v2\libs\thread\build\msvc-10.0\debug\debug-store-database\threading-multi\win32\thread.obj...” and many others like this.

I tried building the 1.49 version and everything was fine, so I started digging in the jam files, specifically the one for MSVC - tools\build\v2\tools\msvc.jam. After a lot of wasted time, I was able to locate the problem - in the rule “compile-c-c++”, “PDB_NAME on $(<) = $(<:S=.pdb) ;” (that’s line 383 in the file) was behaving strangely. Reading the boost build guide (http://www.boost.org/boost-build2/doc/userman.pdf), I worked out that $(<) means the first argument, $(<:S) selects the suffix, and $(<:S=.pdb) would replace the suffix with “.pdb” - exactly what we want.

However, for some strange reason the replacement converted “bin.v2\libs\thread\build\msvc-10.0\debug\debug-store-database\threading-multi\win32\thread.obj” into “win32\thread.pdb”. $(<) was the whole string, but the replacement trimmed the beginning. There was no “win32” folder in the root boost directory, so when bjam tried to output some file it failed.

I played around a little with the jam file but didn’t get any results, so I took the easy way out and just created all the folders that are needed. Here’s the full list:
    converter
    cpplexer\re2clex
    encoding
    gregorian
    object
    shared
    std
    util
    win32
I also couldn’t build boost::python with the error message “No python installation configured and autoconfiguration failed”, yet my python was conveniently placed in C:\Python27. I didn’t want to spend a lot of time on figuring this out, so I tried a solution I found in this thread http://stackoverflow.com/questions/1704046/boostpython-windows-7-64-bit and it worked so I didn’t dig deeper. This is supposed to fix paths that have whitespace, however it apprarently breaks paths that don’t. So, just locate the line “python-cmd = \"$(python-cmd)\" ;” in the “if [ version.check-jam-version 3 1 17 ] || ( [ os.name ] != NT )” section in the file tools\build\v2\tools\python.jam and comment it with # in the beginning.