Thursday, February 21, 2013

Adding a HTML5 minigame in Unity3D with Coherent UI (Tutorial)

Today, we're starting a new series of blog posts with educational purposes. These posts will essentially be short tutorials for some cool new usage of HTML in your game. Let's get right to the point and see what this first tutorial has to show.

Goal


Embed an existing HTML5 minigame that opens a door upon completion.

For this demo we've chosen a minigame called "Memory Box" - you can try it out on this URL. All credit for the game goes to its authors. There's only one change in the code - we added an inline CSS style style="background-color:rgba(0,0,0,0);" to the <body> element and removed the background-color: #000; line from the CSS at the top of the HTML file to make the background transparent.

If you're very eager to see the final result, the video is at the bottom of the article.

Prerequisites


  • The AngryBots scene that comes with Unity3D
  • A cube mesh (the Unity3D box has flipped texture coordinates and shows Coherent UI textures upside down). We used this one.
  • Coherent UI for Unity3D (we'll also assume that you've already imported the package in the AngryBots project)

Scene setup


The first thing to do is to pick a door that will be opened when the user completes the minigame. In the AngryBots scene most of the doors are prefabs that have pre-attached scripts. I picked an internal door near the hologram around the entrance. It uses the TriggerOnPresence.js script and I'll refer to it throughout this article, so keep that in mind if you choose another door (external doors use a different script, for example).

Now that you have picked a door, add the cube-textures mesh somewhere around the door. It will be used as a surface where the minigame will be rendered. You don't need the whole cube, just the front face will suffice, so feel free to delete the unneeded ones. It's helpful to rename the new GameObject to something meaningful such as "CoherentSurface". That's how we'll be referring to the object from now on.

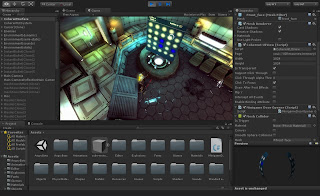
After you're happy with the placement of the object, add a CoherentUIView component to the surface so we can display HTML on it. Configure the URL, the resolution and make sure to tick the checkbox for transparency (you might not need it, depending on the minigame) and "Click to focus". The latter redirects input to the CoherentUIView after you click on the surface and is useful if you can't be bothered to write input forwarding code :).

If you hit play now you'll already have the minigame up and running, but it won't open the door yet. The setup so far should look like this:

CoherentUIView setup for the minigame

Short digression: if you tried playing the minigame, you'll notice that the player is firing when you click the dots. This can be distracting, so if you want to stop the firing you can add this code to TriggerOnMouseOrJoystick.js's Update method:

This will toggle the functianlity of the script (which is to fire bullets only) when the user presses the spacebar. Feel free to add any other logic, such as toggling firing when the CoherentUIView gains or loses focus or anything else that you might like.

Door opening logic


The door's opening logic defined by the TriggerOnPresence.js script does the following: when the user enters the object's collision volume, the OnTriggerEnter function is called, which in turn notifies all the subscribers for the specified signal. When the user exits the volume, the OnTriggerExit function is called and notifies the subscribers for the exit signal.

When inspecting the prefab, you'll find out that this signaling breaks down to sending the "OnPlay" and "OnPlayReverse" messages to the "AudioSource" and "slidingDoor" sub-GameObjects. Now that we know how to open and close the door, we can start making changes.

We won't need the proximity triggers anymore so just disable the TriggerOnPresence component from the sliding door GameObject. We'll also need to be able to identify the door's "AudioSource" and "slidingDoor" sub-objects, so we have to rename the door to something unique, such as "interiorDoorSlidingMinigame". After we have this we can open the door with the following one-liner:

GameObject.Find("interiorDoorSlidingMinigame/slidingDoor").SendMessage("OnPlay");

Great!

Wiring the minigame completion to opening the door


First, we want to have means for sending messages to the game from JavaScript. To do that, add the coherent.js script that comes with the Coherent UI Unity3D package somewhere in the top of the HTML like so (the location of the src property may be different):
"<script type="text/javascript" src="coherent.js"></script>".
This will define the "engine" object, which you can use for communication with the game.

Next, we have to find the code that's executed when you complete a level. That's at the bottom of memorybox.js, in the "if(this.isLastCorrectSquare)" conditional. If the script is totally unreadable to you, you can process it using jsbeautifier.org or some other service. Add the line "engine.call("OpenDoor");" at the end of the if block. This will send the message "OpenDoor" to the corresponding ViewListener. That's all for the HTML/JS side - just 2 lines of code!

Last, we have to handle the message sent by JavaScript in the game. To do that we make a new script, MinigameDoorOpener, and add it to the GameObject with the CoherentUIView (the CoherentSurface object). This helper script will subscribe for the View Listener's ReadyForBindings event and bind a handler for the "OpenDoor" message. The handler will simply open the door as we discussed previously. Its code is as follows (the sample script is written in C#, but you can use anything that Unity3D allows):

Now everything is wired and ready to use! After opening the door you can continue playing the minigame if you like it. You can also enhance the demo by enabling the TriggerOnPresence component of the door so it behaves like a normal door after you unlock it instead of just staying open.

Here's the video of the final result:


That's all for today's tutorial on adding big value to your game in 10 minutes. Stay tuned for more!
Friday, February 1, 2013

CryEngine 3 minimap made with Coherent UI

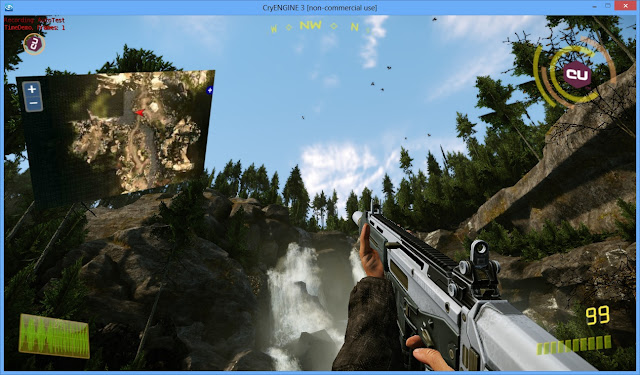
This is just a small update on our demo in CryEngine 3. We added a minimap using OpenLayers giving us all sorts of cartography goodness.

It's bird! It's a plane! It's a map alright!


Update: an interactive visualization of the map in your browser! (the marker uses the default OpenLayers marker image)


Move marker

Rotate marker
The movement and rotation are done automatically in the demo of course :).
[End update]

Our sample barely touches the surface of the possibilities offered by OpenLayers but it's enough for our purposes.  For simplicity's sake, I used a single non-tiled image for the map (which presents artifacts when enlarging the map). The image I used was the one I found in Game\Levels\Singleplayer\Forest\ - Forest.tif (which I converted to a format that doesn't take 16MB). The image isn't fabulous per se (it's blurry and has a lot of discontinuities) and if you want something really cool you can use an orthographic camera in the Editor and take snapshots of different tiles at different zoom levels. When you have the snapshots you can follow this tutorial to make OpenLayers use your local tiles and have a map with real zoom.

Most of the work for the map is done in JavaScript/CSS. You can toggle it by pressing Tab. The C++ part is basically just firing events for the player position and orientation.

The other C++ part (that's not actually related to the cartography) is forwarding the input to the HUD view - I made a new class (CCoherentHUDViewListener) that does the job. You can examine it if you're interested. As a side note, when forwarding input to transparent Coherent UI Views make sure that you set the ViewInfo::SupportsClickThrough to true when creating the view.

The interesting bits of JavaScript for the map are in Bin32/TestPages/hud/js/map.js. There's actually not much to it - we create an OpenLayers map, add a marker representing the player and wire some events that will come from the engine. Here's the whole script (stripped down to the essentials)
Just a few notes about the code - I found the bounds of the area depicted in Forest.jpg by flying around in the Editor and writing down some approximate numbers. You'll notice that I used negative coordinates on the Y axis - that's because it allows easier conversion from the CryEngine coordinate system to the OpenLayers one. If I used positive numbers, I'd have to write a fully fledged linear transform (a number and a minus in this case) instead of just the minus :).

The second note is about the orientation of the player marker - OpenLayers does not provide means for rotating the marker image so we have to use CSS. Fortunately, the marker object gives us all the information about the DOM element that contains the marker so that's no problem.

The HTML code for adding the map is simply <div id="map" class="smallmap">, where the smallmap class defines the size of the div element.

If you want to make the map circular you can clip it using a simple border-radius trick like so:
Here's an example of what this does (may not work on all browsers):
Original

 
Using border-radius

Or you can use some more advanced HTML/CSS technique that fits your needs.

That's all for today's update, the updated code is on GitHub so feel free to try it out and extend it. We'll be preparing the CryEngine3 showcase for GDC this year, so if you're in the Bay area at the end of March feel free to visit as at booth #241 and check it out live!